I've been collecting and painting for almost a couple of years and this is the first time I've sold some of my miniatures.
As many of us, I've sold miniatures I bought and never got to paint, to reduce my pile of shame... but this is the first time I'm selling miniatures I've invested time on.
.jpeg)
.jpeg)
.jpeg)
.jpeg)
.jpeg)
.jpeg)
.jpeg)
.jpeg)
.jpeg)
.jpeg)
.jpeg)
.jpeg)
.jpeg)

My first warhammer fantasy project... (watched my friends play it like 20 years ago... now it's time for me to paint and I hope to field it some day).
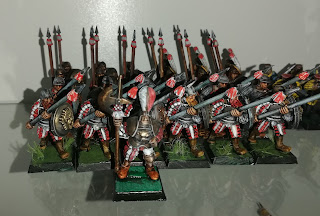
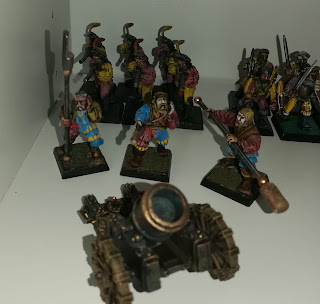
Core unit: spearmen, and detachments will be handgunners and a free company
24 spears plus champion
The rest of the command group... trying freehand on the banner :-/
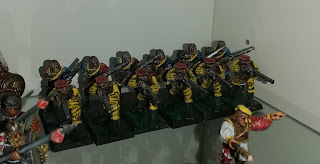
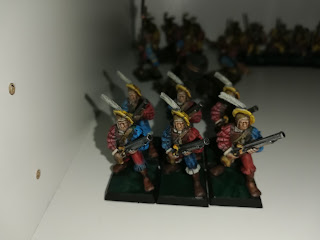
Shooty detachment (12 handgunners) in case someone charges the spears
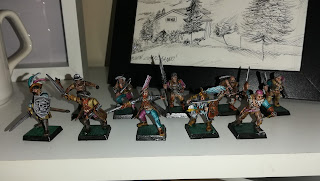
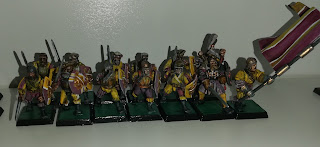
Free company (10 miniatures... also good for Mordheim), still WIP but 2nd detachment for flank-charging units engaged with the spears...
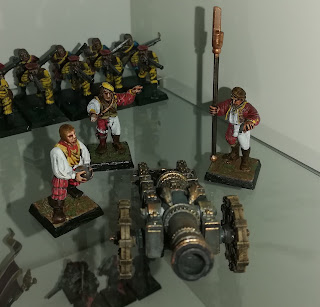
Some artillery: a cannon and a mortar, one day I'll get the third, the hellfire cannon or whatever it is called...
Regular red and white uniforms
These swapped white for blue
2nd unit: swords with command group, supported by more guns, and by more swords (not painted yet, not pictured)
Had fun making all shields variants
Yes, I quickly got bored of the red and white regular uniforms :-)
Need to finish the free company...
Then it's the swordmen detachment, then some heroes (wizard and priest, I have for now) and some cavalry (I have like 5 knights and 12 white wolves knights with command group)...
Then greatswords...
Then I'll have to go over ALL the miniatures, fix the eyes, the bases, etc... but for now I am trying to get them table ready... I knew painting an army would take time, but wow.....
With issue 6, this fanzine has completed a first round of my experimental journey into HeroQuest. In the first three issues I tried to outline a campaign with the same style as the original one, and added a few little rules here and there...
With the second three, though, I've rewritten a lot of rules and procedures, while keeping the core game the same. Issue 4 contains procedures for the GM to generate new, endless, dungeons to explore in your adventures, and issue 5 has new character sheets with enough abilities (tied to an XP/Level system) to keep the players entertained for a while. Of course, if you plan to play hundreds of games, you'll probably have to come up with new heroes yourself, but issue 5 might be a valid source of inspiration.
Issue 6 tackles the last piece of the game: the monsters. It's a simple but exhaustive bestiary, with some variants for the original monsters, and some new monsters (with old miniatures which should be fairly common, even if out of production).
I added a few special rules/abilities for some monsters, to present new challenges to the players, and to keep the GM a little more involved in the game.
Also, while monsters do not have an explicit "difficulty rating", it's quite easy to understand which are more powerful and less common, and which ones should be used as meat-shields by the evil boss of the dungeon. This way, if you want to use the monsters in your dungeons, you can quickly judge, at a glance, if they are minions, a "room boss" or a "final boss".
As all the previous issues, this is free (Pay What You Want on Drivethrurpg... of course if you want to throw me a dollar, your support will be appreciated!):
https://www.drivethrurpg.com/product/360280/FEAR-the-DARK--HeroQuest-fanzine--issue-6

This is a little "how to" about Painting HeroQuest as a beginner. Warning: I am not an expert nor a very good painter! I am average but I guess many who approach the hobby would be content with results similar to mine (I know I am).
What you can learn here, is just the very basic, and probably with MISTAKES, but for sure you will find nothing which is too hard or too advanced. This is a guide FROM A BEGINNER PAINTER WITH JUST 1 YEAR EXPERIENCE, TO ANY BEGINNER WHO HAS ZERO OR ALMOST ZERO EXPERIENCE.
There is nothing advanced or very expensive here, painting a full set of miniatures like HeroQuest or any similar boardgame is something that can be done in just a few months, dedicating to miniatures maybe one or two evenings a week and occasionally a few hours in the weekends...
(Maybe later on I will make a new post with a few more advanced tips)
First of all - what to buy.
- Brushes
- Contrast Paint
- Normal Paint
- Primer
What to have - don't need to buy:
- A good light
- A magnifiying lens
- A miniature handle
- A wet palette
- Tools
- Washes
MUST HAVE
I started with a Citadel Layer and a Base brush. I ruined them (especially the Base) quite quickly.
I bought a very cheap set (like 5 coins or so)* of 10 ugly brushes, from size 000 up to size 5. I use mostly size 2 and 3 for large portions or Contrast paints, and sizes 000 00 0 and 1 for details. The larger brushes were recycled as dry-brushes.
You don't need very expensive or good brushes to start. Later on, I plan to buy one or two for myself, but for now I survived.
Pay attention: clean your brushes every time with soap or whatever. Otherwise they will be ruined. I've read this advice and didn't believe it. I ruined the Citadel brushes because they looked like they were clean with just water.
Also: do NOT put the brushes in the water cup with the tip laying on the bottom of the cup. The tip should NOT touch the bottom of the cup (you will be amazed how long it took me to discover this). At the start I would clean them leaving them only in water, then in soapy water, but always with the tip down. They bent, all of them, of course.
What I do now is wash them even if takes a little time, and afterwards I drop them in a plastic bottle filled with soap and water almost to the top, with the tip down, and leave them there for example for the night. They FLOAT and the tip doesn't touch the bottom. This procedure would probably ruin the wood part of good brushes, but mine are cheap and I don't care.
If you clean brushes with soap, make sure to wash them afterwards with water. Then wash them again, with water. Then again, with water... if you have soap leftovers on your brush, or even on the metal part of it which you may then dip into your water cup while paiting, it will mess with your paints!
Also, since I will advise on buying Contrast paint: use Contrast paint only with the cheap brushes and take as little as you can in your brush. Contast gets sucked up to the upper part of the brush and dries there, ruining them...
Also: use the dry-brushing technique and especially with metal paints, only with the cheap brushes.
In short: buy cheap, buy a cheap set so you have many, buy expensive maybe only for details. Use cheap brushes for Contrast and dry-brushing (or easier: use the expensive brush only for details, otherwise try always to use a cheap brush). CLEAN THEM WELL, always. Treat the tip with care, ALWAYS. See above for some advice on cleaning.
Absolutely. Well, not absolutely, but it helps. Select your colors knowing that they will NEVER be good for details, so for example get yellow and green (maybe two) and blue and red for clothes, a couple of browns at least, something for human flesh, something for metal.
My initial list was:
- yellow (iyanden yellow),
- green (ork flesh),
- red (blood angerls red),
- blue (ultramarine blue),
- black (black templar),
- brown (cygor brown, too dark),
- human flesh (guilliman flesh)
I added another lighter brown for wood, but I want a third one for leather. So I guess both these two are good to get from the start:
- wyldwood (tried it, this is good)
- snakebite leather (planning to buy, just guessing here)
I also added (and should have bought from the start):
- space wolves gray which works well for metal (it's not that gray, it's somehow blue...).
Also, from the very beginning I had:
- Skeleton Horde for undead (plus it's almost a perfect wash). A must for undead.
What I suggest is to get as many as you can (even if they are a little more expensive than average). For example, buy one red and one yellow, but maybe also an orange if you want to use that color. If you want some variants on the green skin (goblins, orcs, fimirs...) buy different bottles of different greens (Contrast is not easy to mix because you use it straight from the pot).
Buy maybe a skin variant (like fyreslayer or darkoath... I guess in the end I'll buy both). Contrast is great for human naked skin, which is not sooooo easy with regular paints.
Also, for sure I will soon add:
- Basilicanum gray (again, they're not easy to mix, so having a black doesn't mean you can easily have a grey)
- Apothecary white
- Aggaros dunes (great as a wash, they say)
Pink and purple (like orange) and blue variants etc. buy when you plan to use for a specific model or a set of them.
How to use Contrast Paint
Use them every time it's possible. Like: all clothes, all weapons, all skin, all hair. All wood, boots, gloves, ANYTHING which is not too small.
Cover ALL the undead (incl. mummies and zombies), litterally, with Skeleton Horde and then you can cover up on weapons and clothes, or do details like the eyes etc.
Buy a starter set - absolutely. Don't trust anyone who says that you can use Contrast for details. It's going to be a mess, and frustrating, and not work (maybe a skilled painter can do it... not a beginner).
A started set of 20 or so colors will do, I like Vallejo because they are cheap, in dropper bottles, and almost perfectly thinned out of the pot.
Of course, you will use a lot of white, black, and metallics from this starter set. Don't worry, painting an HeroQuest set will NOT use up all your starter set. And you don't need 100 colors right now. You maybe want them (I know I want them), but you don't need them.
With regular miniature paints, you can mix in your wet palette, and make all kind of other colors and shades etc.
You will use regular paint for DETAILS mostly, and to cover up and fix the errors you may have done with Contrast.
How to use Regular Paint
Ok, leaving jokes aside for a moment; use regular paint to highlight edges, for dry brushing, for little details. With Contrast Paint you just need to be a bit careful, but Contrast flows easily and it's nice to use.
Regular paints, on the other hand, are harder to master but will give you better results. As I wrote, you need only a basic starter set, nothing more. With regular paint you will need to consider this (in this order):
- Dry brushing: watch a video or two. It's great for adding highlighting and make the miniature details pop. For tabletop standard, and for beginners, it's a great technique. Just remember this: you always have little too much paint on your brush. Dry brushing works also very nice for metals; if you paint a sword black and do some metallic drybrushing on it, it will look much better than if you painted just metallic over it.
- Edge highlighting: again, watch a video or two. Learn how to tilt your brush, and in which direction to rotate the miniature or the brush to have the perfect angle. Learn how to keep your brush steady.
- Little details: you can use regular paint to cover up mistakes, to paint over Contrast paint, and of course to paint tiny details. When working with tiny details, try to have as little paint as possible on the tip of your brush, and do one or two phantom touches, without actually getting color onto the miniature... Remember that it's easier to add more with a second pass, than to cover and correct.
(painting eyes is hard at the start: you can always paint the eyes dark and add just a tiny white dot at the center... they look almost as good as "regular" painted eyes)
Primer
You will need one. They gave me Corax White. I know there is a grey out there and there are blacks etc.
Now, with Corax it seems like the Contrast Paint works well, and with grey it seems (I didn't try) that colors are a little bit richer but also darker. You can probably do well with a light grey too.
Of course, do not do black. (You could do the whole black primer plus zenital highlighting in white... it's not what I did, so I cannot advise on that)
Do not skip the primer, don't paint directly on plastic.
Not needed but REALLY NICE TO HAVE
A good light/magnifiying lens
You can paint with just the normal room light, if you're next to a window and have (still) a good sight. More often than not, though, a little lamp is really, really useful. My results improved greatly, when I bought a lamp and actually managed to see what I was painting.
I've put this together with magnifiying lens because if you're a beginner, probably you can buy a small lamp with a circular led light around a simple magnifiying lens. Buy one object and get two...
I don't use the lens, usually - maybe just to double check what I did (beware: if you don't aim for super extra perfect, if you notice a mistake with the magnifiying lens which is invisible at the naked eye, remember that you will be playing with miniatures, not keep them under the lens for inspection... so probably there is no need to worry too much and correct every single minor almost-invisibile imperfection).
Miniature handle
I used it at the start then almost never more... I don't know, I guess it depends how well do you adapt to it. Of course it's almost a must with tiny pieces, but probably you can just buy bluetack and instead use anything as a handle, instead of buying the tool itself which in the end is just a piece of plastic.
Wet palette
This is again something you can build by yourself, with a sealed box and a simple sponge, and oven paper. I said to myself I would buy a professional one, one day, but I've still spent all my budget on miniatures, instead :-)
I guess home-made wet palettes are still good enough for beginners.
Tools
Ok, yes, you need clippers and an exacto knife and all that sort of stuff. Nothing expensive, and if you look at a starter kit from any vendor, you can probably just use it as a checklist for going to buy this sort of tools in any hardware store. Probably you already have many of them at home.
I started without, and then bought two (one black, one brown) just to try them out...
Well, now I use them quite a lot. If you use washes you then need to wait for them to dry well, and in general it makes the process of painting a miniature a little longer... but they give a much better result in defyning shadows.
You can buy washes or you can make your own (just look for a few videos explaining how to black wash a miniature for example).
* I use the term coins because I guess 5 euro or 5 dollars would get you more or less the same kind of product... The euro is stronger than the dollar but I think this type of market is cheaper in the US, which makes 1 to 1 proportion fair, in my opinion.
With issue 5, this fanzine continues to present a set of additional rules which aim to make the game last longer, funnirer and slightly crunchier (without drifting too far from its original simplicity). In this issue you’ll find four new characters sheets which allow your players to pick up the old heroes miniatures giving them a new life. These characters, though, are not born “heroes” but “adventurers”.
The first thing that comes to mind, when thinking of adventurers and dungeon crawling, is that characters venture in dark and dangerous dungeons to find treasures, and with treasures come experience and improvements. These improvements are something to look forward to; characters start weak and may have to retreat from missions which are too dangerous. They cannot face any kind of threat from the start - but players know that their characters can become stronger in time, and this makes up for their early struggles.
In a few words, then, issue 5 just gives you your four original adventurers with some cool abilities to unlock adventure after adventure. It features a simple system for gaining XP and therefore unlocking these abilities, and a simple encumbrance system with movement penalty.
As all the previous issues, this is free (Pay What You Want on Drivethrurpg... of course if you want to throw me a dollar, your support will be appreciated!):
https://www.drivethrurpg.com/product/360277/FEAR-the-DARK--HeroQuest-fanzine--issue-5

If you missed them, here are the previous issues:
1: https://www.drivethrurpg.com/product/329570/FEAR-the-DARK--HeroQuest-fanzine--issue-1
2: https://www.drivethrurpg.com/product/334395/FEAR-the-DARK--HeroQuest-fanzine--issue-2
3: https://www.drivethrurpg.com/product/344012/FEAR-the-DARK--HeroQuest-fanzine--issue-3
4: https://www.drivethrurpg.com/product/353187/FEAR-the-DARK--HeroQuest-fanzine--issue-4
Although I'm a fan of the old school design of the original HeroQuest, I have to say that some new miniatures have their charme.
If you've read the blog before, you'll know already that I started painting less than one year ago, and soon started to work on a 2nd hand HeroQuest set, until I completed all of its miniatures and furniture. Moreover, I started slowly adding to it some old miniatures for additional monsters etc...
But there is only so much you can do with old school design, and I hate to mix old and new minis, because of their different sizes and their diffent styles.
So I started exploring AoS miniatures, and in particular I thought Underworlds (a game I don't play...) had some very cool sets. The good thing about Underworlds is that it provides monsters in small warbands, usually 4 to 6 or 7 miniatures in a cheap(ish) box. (Cheap at least if compared to other GW products)
It looked like I could build a "new-looking" HeroQuest set almost only with Underworlds warbands... they had goblins and orks, released recently some saurian (seraphon) which could replace fimirs, they had skeletons, and ghouls which could replace the zombies... no mummies but plenty of spectres (like nighthaunts or banshees) and various boxes of barbarians/chaos champions etc.
I was just in trouble for the heroes... what to do? Then I realized that the modern-looking heroes I bought on ebay (which represent the original heroes in the poses they had on the box cover) were perfect. They were of the proper size (Underworlds and in general modern miniatures are more on the 32mm scale than 28mm), and were dynamic enough.
They just had squared bases.
So I bought DAS and bluestuff (my first experiment with bluestuff, really), and "cloned" a few round bases from other Underworlds miniatures. I wanted Underworlds bases, not just round bases. Underworlds provides each mini with a scenic base which is also a little bit taller than the simple flat discs we typically use. And I wanted the same base for heroes and monsters.
Below is the result: a barbarian and a few monsters for scale, then the whole party of the 4 heroes. Not bad; I actually prefer this look to the one of the new HeroQuest remake that Hasbro will put out (and which is unclear if it will be available for sale after their crowd-funding campaign).